Let me start by saying that not too much grosses me out. I'll add to that by saying that I'm pretty good at following directions and figuring out mechanical things. I've taken apart and put back together several heads in my day, so when the Groco in our main stateroom stopped pumping water, I decided I'd rebuild it using the rebuild kit I'd bought over a year ago in anticipation of this day.
For my landlubber friends, let me add that a marine toilet is not a simple device like you have in your house. Your toilet's handle pulls a chain that opens a flapper valve that allows a tank of water to flush your business away. A marine toilet usually has to pump waste uphill to go overboard when offshore, or to a holding tank using a minimal amount of water while doing so. Therefore, it is designed with valves and flappers and pistons to accomplish this task and is considerably more complicated than a formula one race car's transmission.
The first thing I did was to lay the rebuild parts out on the table and to read the "directions".

The "directions" consisted of a Groco user's manual with an itty bitty exploded view of the head's construction and a narrative of the overhaul procedure. Hey, I can figure this out. I used to build computers for a living. I just need to find my magnifying glass.


Yep. There it is. A set screw. I finally managed to get needle nose pliers on it and got it loose and removed the HT-3570-A foot pedal.
Next, "Removing valve cam #21, exposes the piston crank assembly, #'s 12 through 18 (K-32). Pressing the piston down to its lowest position will expose the crank set screw, #16 (51618X112HB) in the inlet port. Loosen the crank set screw approximately 3 turns using 1/2" socket wrench (the position may have to be tapped to the full down position with a rubber mallet to enable seating of the socket head on the set screw.) Note the approximate shaft handle position to assist reassembly of the shaft key. Now remove pump shaft, #31 (HT-6566-K) and pump handle arm, #29 (HT-3560-D) by tapping on the inner part of the handle arm as close to shaft as possible..." blah blah blah.
With much effort, I loosened the set screw and got the handle off. Now the piston.
"The piston has a threaded hole, either 1/4" [20 older models], or 5/16" [18 newer models], that allows you to screw in a bolt to aid in the removal of the piston and crank assembly."
I peered inside. It was all gunk. I didn't see any threaded hole. So I started scraping the pump with a screwdriver. After about an hour, I had it cleaned up to the point that I could see the hole. I cleaned it out with a small screw driver and screwed in a bolt.


For my landlubber friends, let me add that a marine toilet is not a simple device like you have in your house. Your toilet's handle pulls a chain that opens a flapper valve that allows a tank of water to flush your business away. A marine toilet usually has to pump waste uphill to go overboard when offshore, or to a holding tank using a minimal amount of water while doing so. Therefore, it is designed with valves and flappers and pistons to accomplish this task and is considerably more complicated than a formula one race car's transmission.
The first thing I did was to lay the rebuild parts out on the table and to read the "directions".

The "directions" consisted of a Groco user's manual with an itty bitty exploded view of the head's construction and a narrative of the overhaul procedure. Hey, I can figure this out. I used to build computers for a living. I just need to find my magnifying glass.

See, there's the exploded view, with numbers pointing to each of the fifty itty bitty parts.
The first thing I did was to switch the Y-valve from the holding tank to overboard and to flush a lot of water through the head. This kind of a job is always messy, and when the water started to flow, I wanted it to be clean.
There it was. The enemy.

The first step was to unbolt the bowl from the base unit which housed the pump. Four nuts, no problem. Removing the flap plate from the pump casting took a bit of doing, but I pried it out.

Next I had to "Remove foot pedal and valve assembly by removing screws, #23 (1024X12HB), inlet casting #24 (HT-3556) and gaskets #25 (HT-3557-A), and #26 (HT-3557). Loosen the cam set screw, #22 (1420X38RB) and foot pedal spring #36 (S-72587) and remove foot pedal, #37 (HT-3570-A) and valve cam, #21 (K-1). Replace gasket #26 upon reassembly. The cellophane gasket #25 is not needed unless the head will be stored and not used for a long time."
OK then. So reading the above paragraph two dozen times and comparing the part numbers to the itty bitty exploded view, I figured it out and got it apart.

By the way, the blue towel is a dog towel. I would never use a human being towel to mop up during a head project. Right honey?
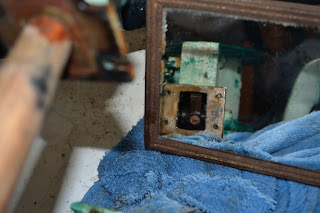
The problem now was that the cam set screw was hidden inside the pump casting, at the back of the unit. I put a mirror behind the casting to take a look. See it there?

The screw was slotted for a screwdriver. Half the head of the screw was missing. No matter what I did, I couldn't get a pair of pliers on it. This was mainly due to the fact that I couldn't find my pliers anywhere. So I decided to really complicate this project by unbolting what was left of the head from the base so I could get at it.

Next, "Removing valve cam #21, exposes the piston crank assembly, #'s 12 through 18 (K-32). Pressing the piston down to its lowest position will expose the crank set screw, #16 (51618X112HB) in the inlet port. Loosen the crank set screw approximately 3 turns using 1/2" socket wrench (the position may have to be tapped to the full down position with a rubber mallet to enable seating of the socket head on the set screw.) Note the approximate shaft handle position to assist reassembly of the shaft key. Now remove pump shaft, #31 (HT-6566-K) and pump handle arm, #29 (HT-3560-D) by tapping on the inner part of the handle arm as close to shaft as possible..." blah blah blah.
With much effort, I loosened the set screw and got the handle off. Now the piston.
"The piston has a threaded hole, either 1/4" [20 older models], or 5/16" [18 newer models], that allows you to screw in a bolt to aid in the removal of the piston and crank assembly."
I peered inside. It was all gunk. I didn't see any threaded hole. So I started scraping the pump with a screwdriver. After about an hour, I had it cleaned up to the point that I could see the hole. I cleaned it out with a small screw driver and screwed in a bolt.

See the bolt in the pic above? Yes, it's off center. No, I don't know why. But what I do know is that the piston wouldn't budge, not even a little, no matter how hard I yanked. I took the unit to my vee-berth workshop, set it on my pretzel can, and took a heat gun to the pump body and got it real hot. The piston still wouldn't move. Time to call Groco.
I called Groco sanitation service support and spoke to Patrick. It was obvious that he knew this head well, and knew all about the problems encountered when rebuilding it. "Put the handle back on, and pull the handle until the piston goes to the top. That will get you most of the way there. Then remove the bolt and put a threaded rod in it. Get a board and drill a hole in it and put it over the threaded rod, and then put a washer and a nut on it and crank it down...." yada yada yada.

I went to my workshop. I tried to reinsert the handle through the pump body and into the crank. It didn't line up. I stuck my finger into the pump body and moved the crank around. It was a press fit into the crank. There is no way. I also noted that the key was missing. Not that it mattered since there is no physical way to get the handle's shaft into the crank anyway, let alone do it while lining up the key.
So then I did what all of you would have done in the first place. I picked up the phone and ordered a new head. I ordered a simple $200 Jabsco. If it breaks, I'll toss it overboard and order a new one. No more head rebuilding for me. I'll stick to easy stuff, like computers.
Elegant solution to an rather unpleasant problem Dave! Well done! :-)
ReplyDeleteI'm with you Dave. Cheap marine heads make more sense to me. They're tight and leak free, clean. You can rebuild them a few times(or not)before the plastic becomes too brittle. We get over a decade out of one with usually one rebuild kit, then go buy another. It's like getting a head remodel for 200 bucks.
ReplyDeleteMy sister in law was in Savannah last night and took our son out to dinner. She's headed down to Jeckle island for a few days to enjoy your heat. We'll maybe touch 50 today in Rockport, which feels downright balmy to us.
You just make me shake my head and laugh.
ReplyDeleteThen again I can rebuild a head but not real good on computers.
BTW If you are trying to get something that is metal and inside something else you don't heat it as that will make the inside part expand and get tighter.
And yes buying a new one is the easiest way. LOL
too funny - only you can make light of a shitty situation. Glad to see you have gotten an attitude adjustment. I'm thinking that blue towel used to be a human towel at one time and somehow may have been involved in a project to become a dog towel? Only speaking from experience.
ReplyDeleteDeb
Marine heads are one of the things I definitely do not miss since I swallowed the anchor. There seems to be an unwritten law regarding things marine that set screws must be hidden, and if possible at least one bolt placed where it can not be accessed without cutting a hole in the hull from underneath. And then it must be of a size and thread which can not be obtained except from the manufacturer who has gone out of business and sold the surplus stock to a mad cousin of the unibomber who can be reached only by snail mail three months of the year and who will respond only if certain code words are written on the otherwise blank check.
ReplyDeleteWhat? No Victory Beer? That good decision you made (a little late, but never the less) earned you one!!!
ReplyDeleteNo more re-building heads for me. Ever since PHE II started selling their pumps separately. I've got a cheapo Wilcox Crittendon and made the PHE II fit on the Wilcox for about $20 more than the cost of a re-build kit.
ReplyDeleteOnce Again-- You made my coffee better...
ReplyDeleteDave, I have one of these heads I just rebuilt. You should have used threaded rod not a bolt and a bit of grease. Mine was a bit tough at first, I cleaned the cylinder in the down position with a scrub pad, then pumped to the top and it came right off. Also, there are certain places that need to be greased on reassembly.
ReplyDeleteThis is where I am stuck. Can't get the piston out. This toilet was too expensive to begin with and now this rebuild mess. I think your solution about just getting a cheaper toilet is the answer.
ReplyDeleteThank you, thank you... Just thought I'd peek at this post before zipping down to Defender for the K-Model rebuild Kit ($100) Now, I'm traumatized--the trip I'll still make, but it's the Jabsco compact($160)for me.. I'll miss the old girl, but it'll join the Seagull OB & RDF in memory lane.
ReplyDelete